Chord Track
The Chord Track is a global track (similar to the Arranger track) that provides the ability to perform "harmonic editing" of both Instrument and Audio Parts. This restructuring of chord progressions can affect an entire song, or only the Tracks of your choice. This lets you write musical content with a chord progression that appeals at the time, and make sweeping changes later, without exhaustive editing or re-recording of Parts.
Want to modulate that final chorus for a little extra push of energy, or rethink the harmonic structure of a composition in progress? The Chord Track lets you try these sorts of changes on a whim.
While the Chord Track is capable of very powerful effects, it does have its limits, primarily in that audio cannot be pitch-shifted without some level of artifacts added. We recommend that once you're done experimenting and "prototyping" your song, you re-record any audio parts to fit the new chord progression, especially if they are critical parts.
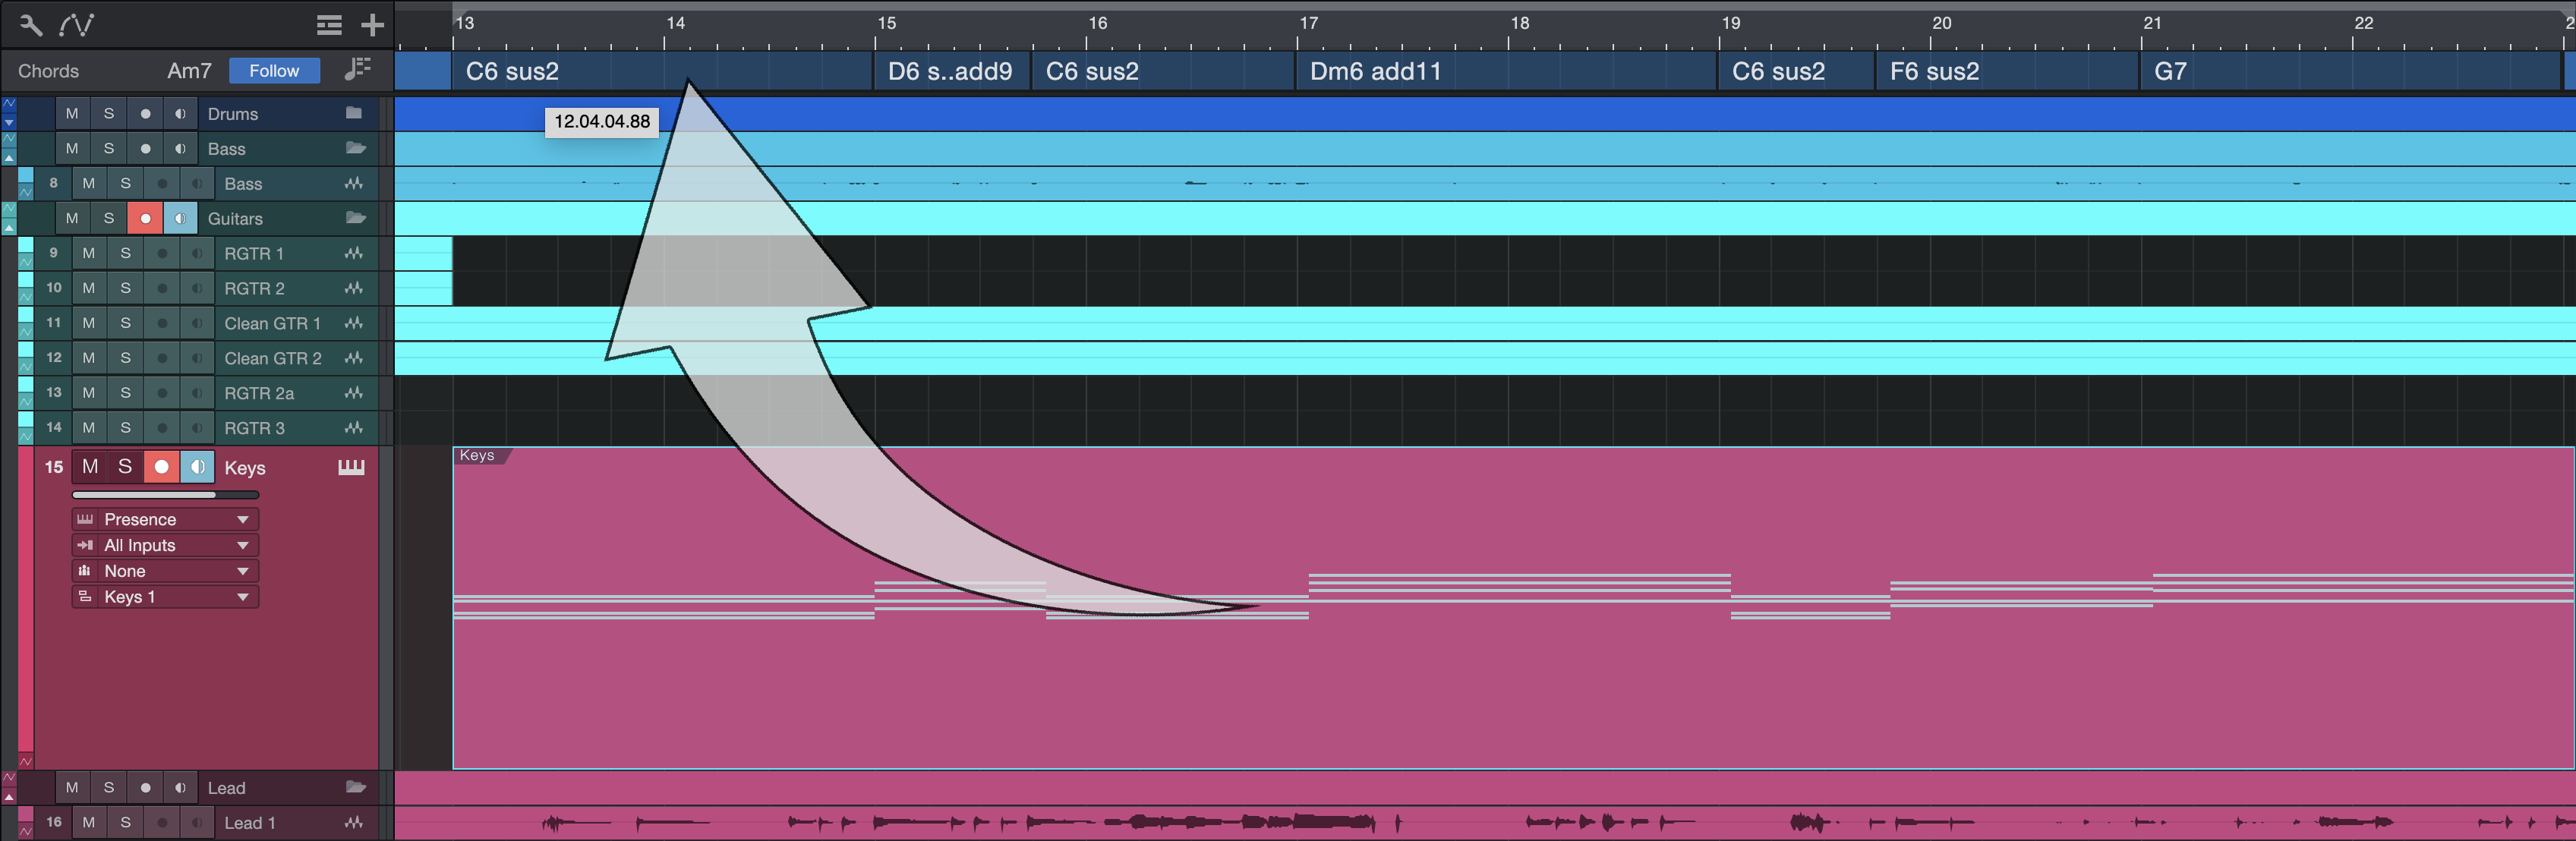
To show or hide the Chord Track, click this button above the Arrange view:  To toggle the effect of the Chord Track on or off for all affected Tracks, click the [Follow: On/Off] button
Getting Started with the Chord Track
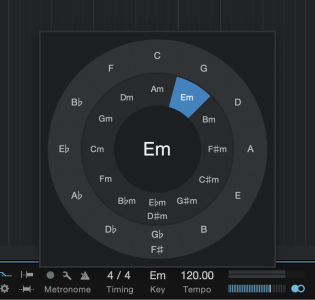
First, set a key signature for the song to ensure proper chord display in the Chord Track. The simplest way to do this is to click the [Key] button in the Transport and select the key of your choice from the pop-up selector that appears.
It is also possible to derive the key signature automatically. There are two methods:
- From an Instrument Part: Select the Part, then [Right]/[Ctrl]-click the Part and navigate to Instrument Parts/Detect Key Signatures in the pop-up menu that appears.
- From an Audio Event: [Right]/[Ctrl]-click the Audio Event, navigate to Audio/Chords, and select Extract Key Signatures from Event. When the Editor is open this is available in the Action/Chords menu. Note that the Audio must have its Chords detected via Melodyne first.
A Song can change key signatures one or more times. See the Signature Track section to learn more about this.
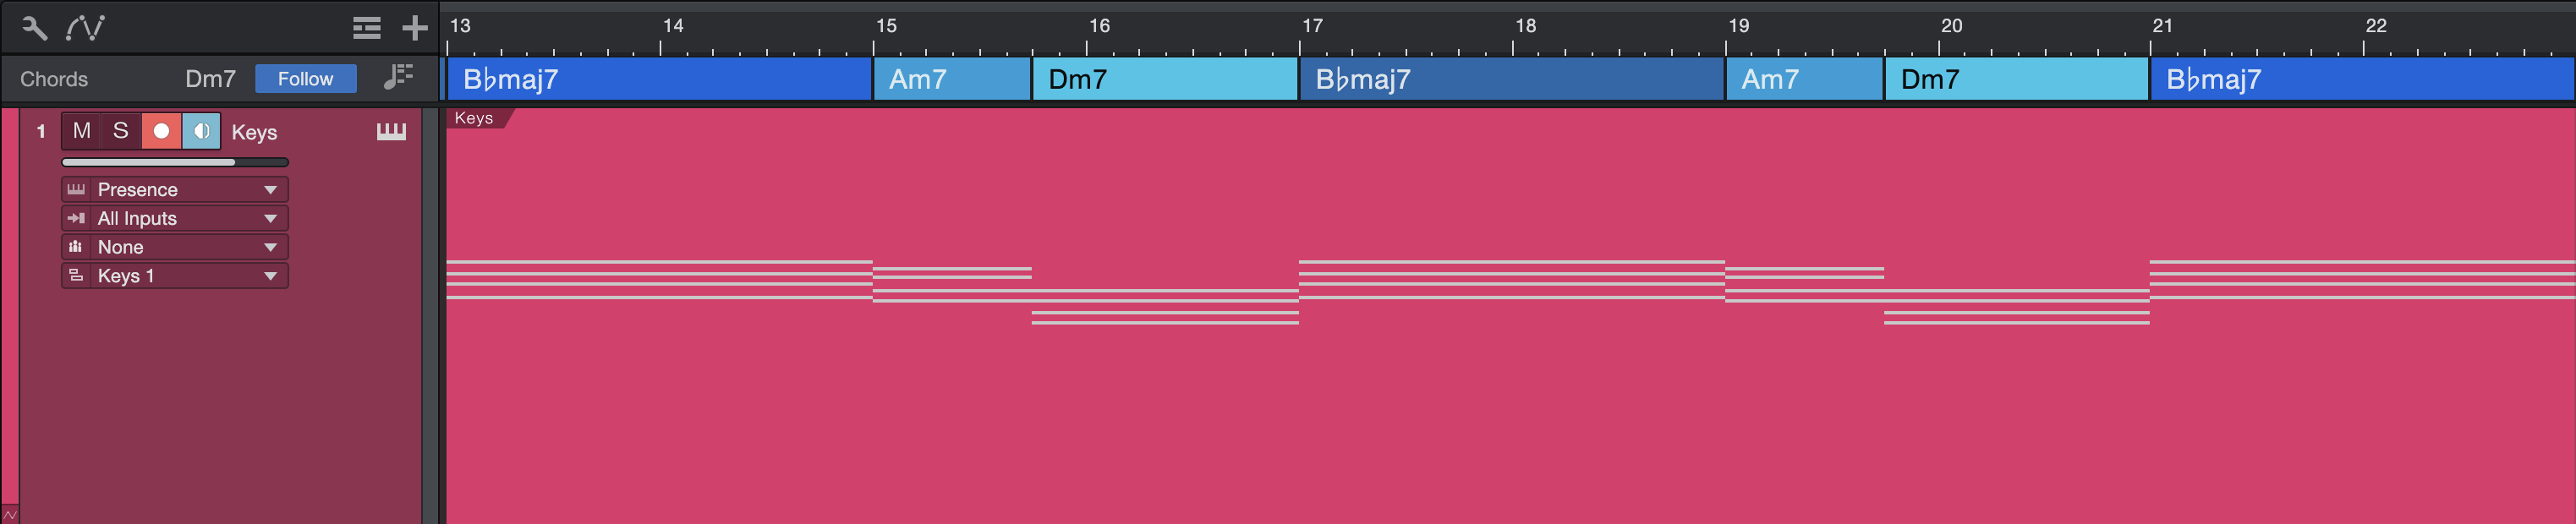
Once you've set a key signature you can begin to populate the Chord Track with chords. This can be done manually, or by automatically detecting the chord structure of your song from its Instrument or Audio Parts.
If any one Instrument or Audio Part in your Song contains musical content that spans the entire length of the Song, you can use that Part alone to auto-detect the chord progression. Otherwise, you may find it useful to export a mixdown of your song, re-import the mixdown to an Audio Track, and use that track as the basis for chord detection. Once that's done, you can remove the mixdown Track.
Next we'll learn how to add, delete, and edit chords in the Chord Track.
Entering and Editing Chords Manually
To add chords manually, select the Paint tool (or hold [Ctrl] to select it temporarily) and click inside the Chord Track. You can also add a chord by double-clicking in the Chord Track with the Arrow tool.
Each new chord section you add is one bar long by default, or the length of the current selection in the timeline. You can change the length of a chord by clicking one of its ends and dragging it to the desired length. If adding chords with the Paint tool, you can also click-and-drag in the Chord Track to create longer chords.
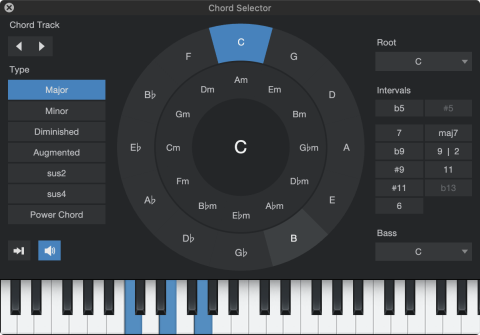
Once you've added a chord, you can change it to a different chord or variation in a variety of ways. Try double-clicking a chord to open the Chord Selector. This window lets you choose from all of the main chord types and extensions. Keep in mind that the Chord Track cannot add notes to chords played in affected Parts. It can only shift the notes that exist. If you want to select a chord with 7, 9, 11 or other extensions, you will only hear those notes if the chords in your Parts contain four or more notes.
If you enable the Instrument Input option by clicking this button  you can play a chord on any connected MIDI keyboard to change the selected chord. The Chord Selector then shows you the name of the chord you've played, and the current chord changes to match. With Instrument Input enabled, you also can select one or more chords in the Chord Track and play any chord shape on a MIDI keyboard to change all selected chords.
Next to the Instrument Input button is the Audition Chords button. When enabled, each chord you select will be played for you. This is a great way to audition different chords to hear how they sound. A Gmaj7sus4 chord might be perfect right there.
Here are some other features you may want to try:
- See if adjacent chords work well together by clicking the Chord Track arrows in the upper left corner of the Chord Selector window.
-
Build complex chords quickly by holding [Alt]/[Opt] and clicking more than one of the following Interval buttons: b9, 9|2, #9, 11, #11, or b13. this will add the tensions/extensions accordingly.
- Build complex chords by holding [Alt]/[Opt] and clicking more than one of the Intervals buttons. If a song calls for a Gm13 add 11, it's yours.
- If you want to see a C# chord somewhere instead of a Db chord, for example, click the Root note in the Chord wheel to toggle between the two. This may be faster sometimes than selecting it in the dropdown Root menu on the right.
-
b5 and #5 can be combined with other intervals, allowing you to shift the 5th within a chord up or down.
-
9|2 is indicative of different octaves of the same tone. You can choose the octave of a 9|2 interval by clicking the icon to cycle through high octave, low octave, or none. The selected interval will be underlined. Note that the “9|2” demarcation is an indicator of the interval options, and not a slash chord.
-
Simply double click the chord name in the center of the Chord Selector to enter the chord manually via your qwerty keyboard—tensions, slash chords, and all.
When you're done editing a chord, you can close the Chord Selector or select another chord in the Chord Track and continue editing.
To delete one or more chords from the Chord Track, select them and press the [Delete] or [Backspace] key on your keyboard.
Extracting Chords from Instrument Parts
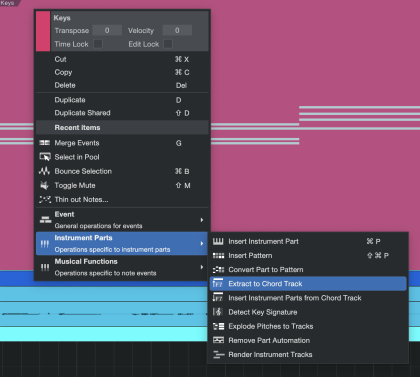
One simple way to become familiar with the Chord Track is to populate it with the chord structure from one or more Instrument Parts. [Right]/[Ctrl]-click on a Part (or multiple selected Parts) in the timeline, then choose [Extract to Chord Track]. This function analyzes the musical relationships of the notes in the selected content, and fills the Chord Track with the chords it recognizes.
You can also simply drag selected Instrument Parts (single or multiple, across as many Tracks as you like) onto the Chord Track to extract their shared chord progressions. This is one easy way to detect chords across a large area of your Song, especially if you're using different Instrument Tracks (with distinct instruments and sound) in each section.
Some types of note data can cause the Extract to Chord Track algorithm to choose chords inaccurately. If you notice any errors, feel free to edit or replace chords using the methods described in Entering and Editing Chords Manually.
Extracting Chords from MIDI files
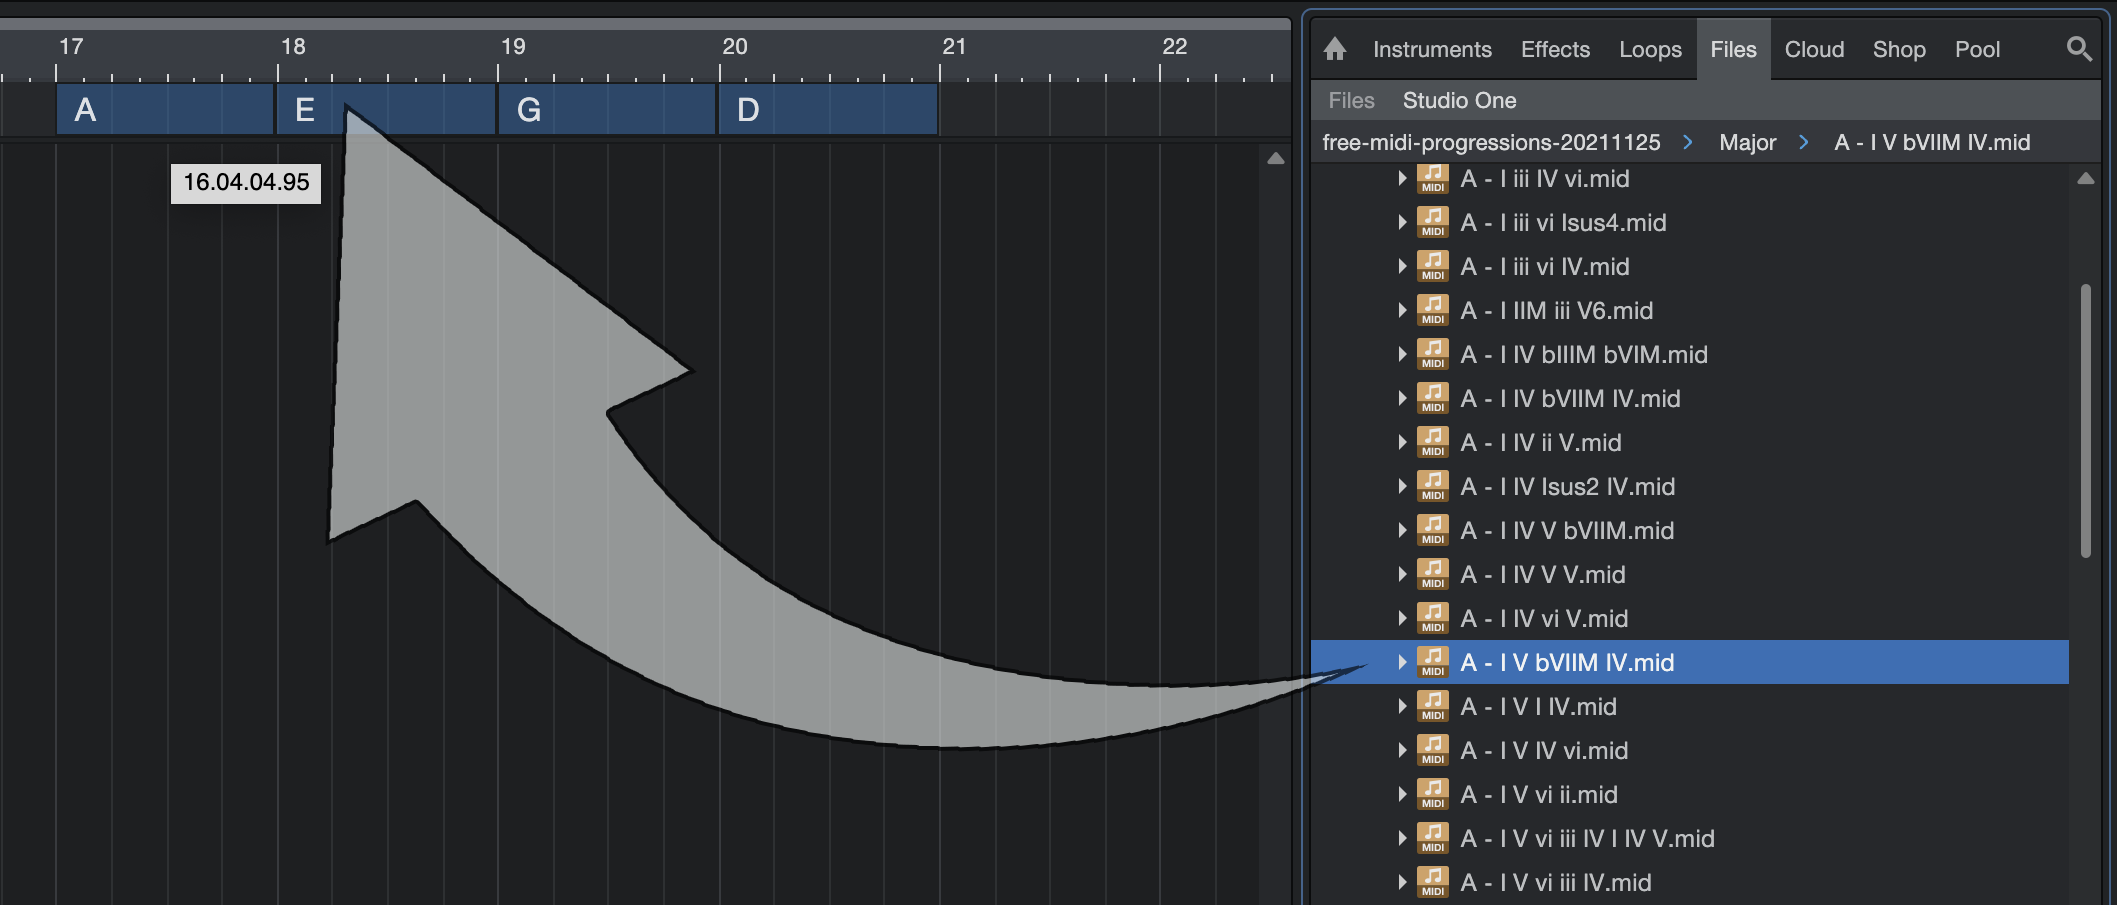
You can also drag and drop a MIDI file from the Browser or your OS’s Finder/Explorer directly onto the Chord Track to detect its Chords. This is an ideal way to get a quick start on a song from a MIDI chord pack. Note that complex songs with many instruments and/or lead melody elements may cause inaccuracies in chord detection.
Extracting Chords from Audio Parts

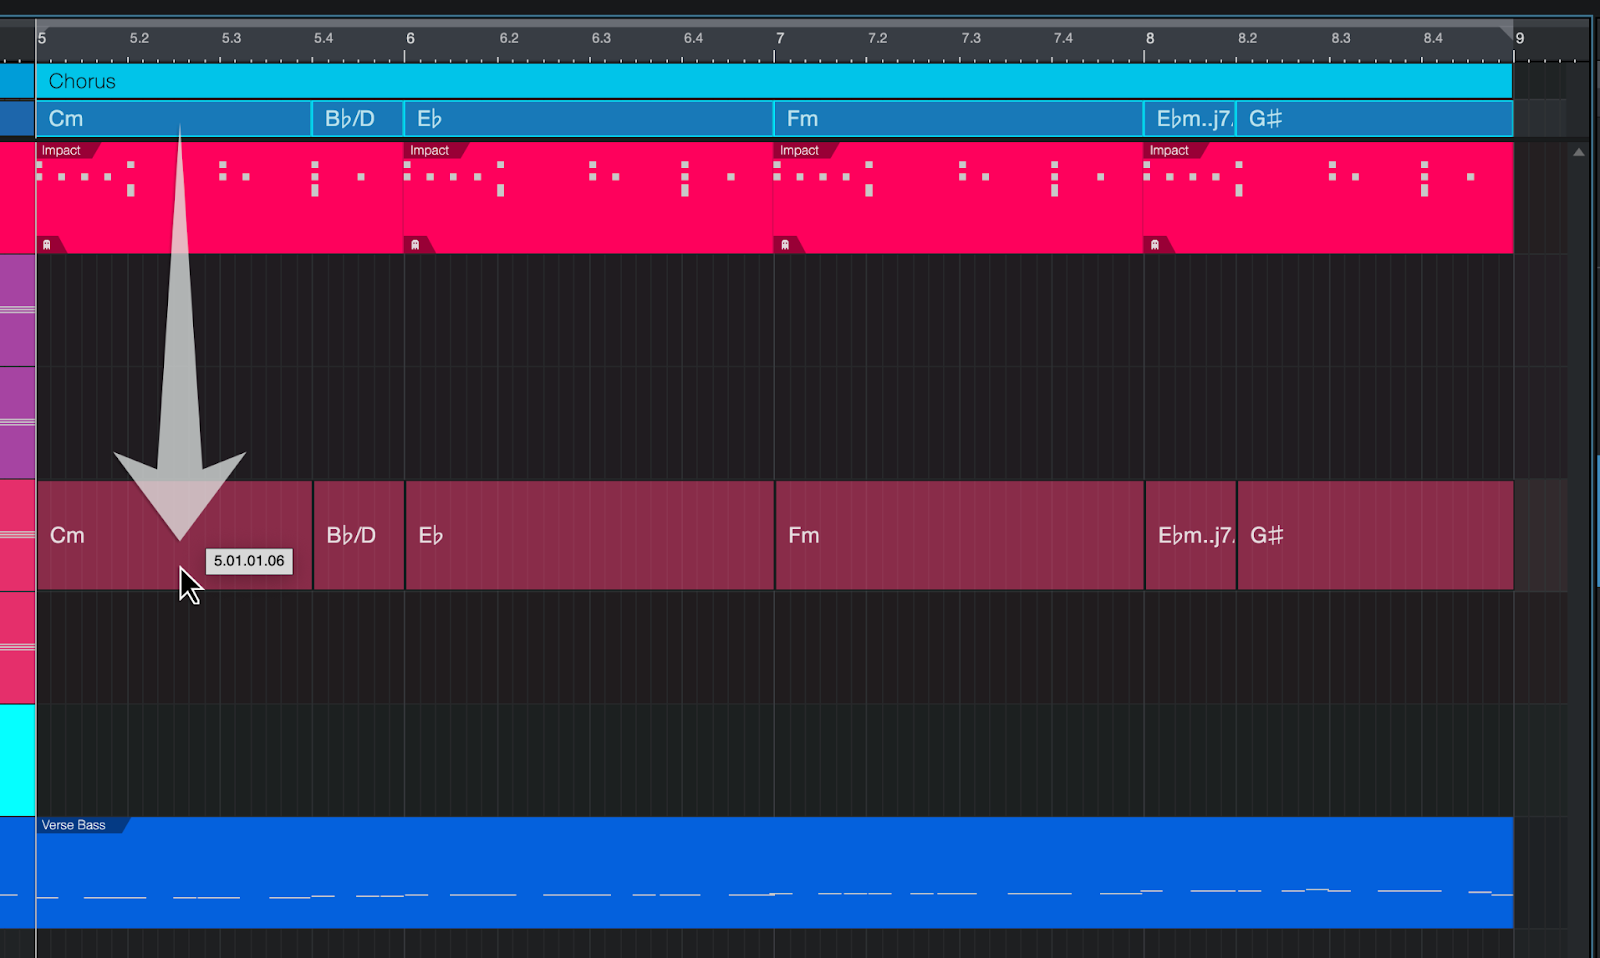
You can also extract chord information from Audio Parts. To do this, select an Audio Part and navigate to Audio/Detect Chords (or [Right]/[Ctrl]-click the Part and navigate to Audio/Detect Chords in the pop-up menu) to analyze the harmonic structure of the Part. Once completed, you can see the detected chords along the bottom edge of the Part.

To apply the detected chords to the Chord Track, select the Part and navigate to Audio/Extract to Chord Track (or [Right]/[Ctrl]-click the Part and navigate to Audio/Extract to Chord Track in the pop-up menu).

The extracted chords are then visible in the Chord track, and can be changed and edited as needed. As with Instrument Parts, some types of audio information can result in incorrect chord detection. If you notice any errors, feel free to edit or replace chords using the methods described in Entering and Editing Chords Manually.
Apply Chords from Chord Track
Some audio data doesn't lend itself easily to automatic chord detection, and if the wrong chords are detected, harmonic changes made in the Chord Track may not bring the desired result. If you find that one or more of your audio tracks do not show the proper chords after using Detect Chords, here is a good way to get around that.
First, detect the chords for that section of the song from another source that detects more accurately. If no Instrument or Audio Parts seem to work, you can try entering the chords manually or with a MIDI keyboard. Then, select the Audio Part that you could not accurately analyze, and navigate to Audio/Apply Chords from Chord Track (or [Right]/[Ctrl]-click the Part and navigate to Audio/Apply Chords from Chord Track in the pop-up menu). This applies the chord designations from the Chord Track to that Audio Part, ensuring that when it is pitch-shifted during harmonic editing, its notes are shifted more accurately.
Create Note Events from Chord Track
Any or all Chord events on the Chord Track can be converted to Note Events in Instrument Tracks by simply dragging the Chord Events from the Chord Track to an Instrument Track. This will create Note Events with the same duration as the Chord Events that created them. These are basic chords, where the lowest note will always be the root note of the chord.
These extracted notes can now be edited or processed just like any other Note Events.
Create Chord Note Events from Audio Events
Chord Track notes can be extracted directly from an Audio Event once its chords have been detected as described in “Extracting Chords from Audio Parts,” above.
Simply drag and drop a Chord-detected Audio Event to an Instrument Track to render the desired Note Events in place.
The Chord Inspector
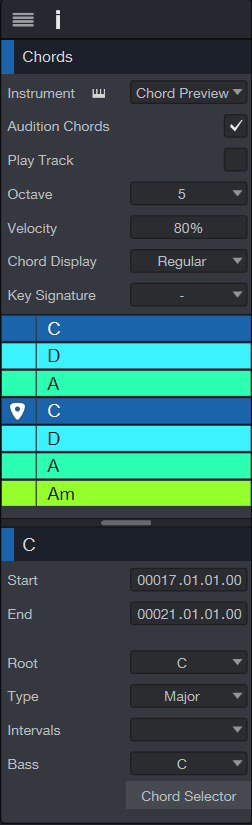
While working in the Chord Track, you can open the Chords Inspector (by clicking the "i" button above the timeline). This reveals a wealth of features and information, including the Instrument Output for the Chord Track and the chord progression of the Song. Working from top to bottom:
- Instrument: Specify the default instrument for the Chord Audition feature by selecting one from the menu. You can use the Preview instrument, any instrument in the Song, or choose an Instrument or Preset from the Browser and drag-and-drop it onto header of the Chord Track. This will become the new default preset for auditioning chords. Click the small keyboard icon to open/close the Instrument view.
- Audition Chords: This button is linked to the "speaker" button in the Chord Selector window; toggle one and the other will toggle also.
- Play Track: Enable this to hear the Chord Track play along with the Song. This will help confirm whether the chords entered manually match the Audio Events, for example.
- Octave: Select the center octave for the Audition Chords.
- Velocity: Click-and-drag or double-click the field to set the velocity at which the Audition Chords will play. The range is from 0 to 100.
-
Chord Display: There are two Chord Display options to choose from within the Chord Display context menu: Chord Display Mode and Chord Display Style. For more information, see the section on Chord Display below.
- Key Signature: This menu is linked to the Key Signature in the Transport, and opens an identical window.
- Chord Progression: All of the chords in the Song are listed in order here. It's a quick way to select a Chord near the end of the Song, for example, without having to locate it in the Chord Track.
- Chord Color: Use this field to select a different color for the selected Chord in the chord progression. It's faster and more specific than finding that Chord in the Chord Track and using [Right]/[Ctrl]-click, although that method also provides other features (see Replacing Chords below).
- Start/End: You can set the duration of the selected chord with great precision using these fields.
-
Root: Use this menu to change the root note of the selected chord.
-
Type: Use this menu to change what kind of chord your selected chord is (major, minor, etc.).
-
Intervals: Use this menu to add intervals to the selected chord (2, 7, #9, etc.).
-
Bass: Use this menu to add a bass note to the selected chord.
- Chord Selector: This button opens and closes the Chord Selector window.
Quantizing the Chord Track
Once you've populated the Chord Track with chords, you may find it helpful to quantize the start positions of those chords. To do so, select the chords you want to quantize, and navigate to Event/Quantize/Quantize on Track.
Often, chord changes do not happen precisely on-beat, especially when working with live recorded audio. After quantizing chords, you may find it helpful to subtly shift the start and end positions of each chord to minimize unnatural shifting behavior and better match the movement of the performance.
Replacing Chords
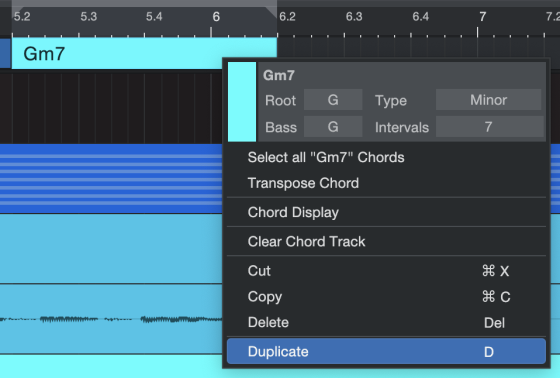
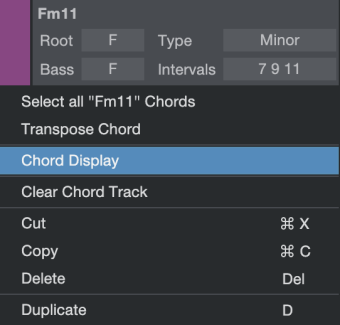
Let's say you like a particular chord better than the one you've been using and want to replace it throughout the Song. [Right]/[Ctrl]-click any one of those chords in the Chord Track to open a menu. You can quickly change the chord root, type, bass note, and intervals here, along with the following options:
- Chord Color: Use this field to select a different color for this Chord wherever it appears in the Song.
- Select all "Dm" Chords: This field allows you to substitute a new chord for the old one throughout the Song. Select this option and the menu will close, then use the Chord Selector to select the chord you prefer.
- Note: D minor is used here as an example, but the actual name will be that of the selected chord.
- Transpose Chords: Enter the number of chromatic steps by which the selected chord should be transposed throughout the Song.
- Clear Chord Track: This option will delete every chord in the Chord Track.
- Cut, Copy, Delete: These are standard functions. A chord can be pasted elsewhere in the Chord Track by selecting a new location in the timeline, using [Right]/[Ctrl]-click, and selecting Paste.
- Duplicate: This option will place the selected chord in the next measure, overwriting any chord that is already there.
Quick Chord Tricks
You can cut, copy, paste, and delete one or more chords from the Chord Track the same way you'd perform other Studio One Pro functions with your computer keyboard. To paste a chord elsewhere in the Chord Track, select a new location in the timeline, use [Right]/[Ctrl]-click, and select Paste from the menu.
The [D] key can be used as a quick way to paste multiple copies of the selected chord or chords in a row. Then minor adjustments can be made to each without having to define the root note, for example. This method will overwrite any chords in its path, so proceed with caution.
Holding [shift] while double-clicking the Chord Track will quickly select all of the Chord Events, which can then be easily dragged and dropped to an Instrument Track.
Setting Chord Follow Behavior
By default, the Tracks in your Song are unaffected by the Chord Track. To allow a Track to change its harmonic structure along with the Chord Track, you must enable one of the Follow Chords modes for that Track.
Follow Chords
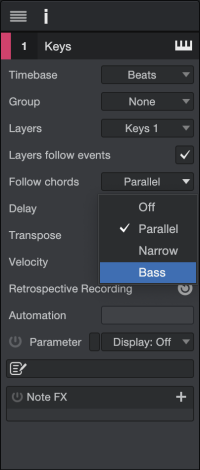
If you select a Track with the Inspector shown, you'll see its Follow Chords selector. This selector offers the following modes, each with its own style of operation:
- Off: The default mode. The Chord Track has no effect on a Track in this mode.
- Parallel: In this mode, chords in the affected Track are shifted in parallel, aligning the root note of the musical content with the root of the target chord. This maintains chord note relationships in the musical content, which may result in some out-of-key notes.
- Narrow: In this mode, notes in the affected Track are shifted to the nearest note in the current chord in the Chord Track.
- Bass: This mode behaves the same as "parallel," but with special rule for the bass note: the source Chord's bass note (or root if it has no bass note) is mapped to the target bass note or root.
- Scale (Audio Tracks only): In this mode, notes in the affected Track are snapped to the nearest scale note in the target chord.
- Universal (Audio Tracks only): This mode does not require the use of the Detect Chords feature before use. In this mode, notes in the affected Track are forced to follow the scale notes of the target chord.
Tune Modes (Audio Tracks only)
Each type of audio material reacts to pitch shifting in a different way. For this reason, you have a choice of Tune Modes that help to optimize the algorithm for each type of source: Bass Guitar, Guitar, Piano, Brass, Lead, and Strings. Whatever your source, feel free to try different modes until you get the most pleasing result. The Tune Mode selector can be found in the Inspector when an Audio Track is selected.
Keep in mind that Tune Modes do not affect the way that the Chord Track shifts the harmony of a Track. They only affect the way the shifted audio sounds.
Harmonic Editing with the Chord Track
Now that you have chords in the Chord Track, and some Instrument and Audio Parts to go with them (with Follow Chords modes selected), it's time to get into some harmonic editing. To do this, simply select one or more chords in the Chord Track and change them in one of the ways described in Entering and Editing Chords Manually . You can enter a chord using a connected MIDI keyboard, double-click a chord to change it with the Chord Selector, or change its parameters in the Inspector. You can add, delete, and change the lengths of each chord to suit the changes you wish to make.
You can also shift the root note of one or more chords by selecting the chords, holding [Alt]/[Opt], and moving the scroll wheel on your pointing device (or using the scroll gesture on your trackpad).
As you experiment with harmonic editing you may notice that certain chords cause undesired results on certain tracks, whether simply creating unpleasant note movement, or with audio, unwanted pitch-shifting artifacts. To help alleviate these issues, feel free to try the various Follow Chords and Tune Modes, or simply tweak the chords in the Chord Track. Sometimes adding additional intervals or changing to a different Bass note can make all the difference.
Remember that you can always switch the effects of the Chord Track on or off for the entire song at once by toggling the [Follow: On/Off] button, to the left of the Chord Track.
A special version of the Chord Track is also available on the Show Page.
Chord Display
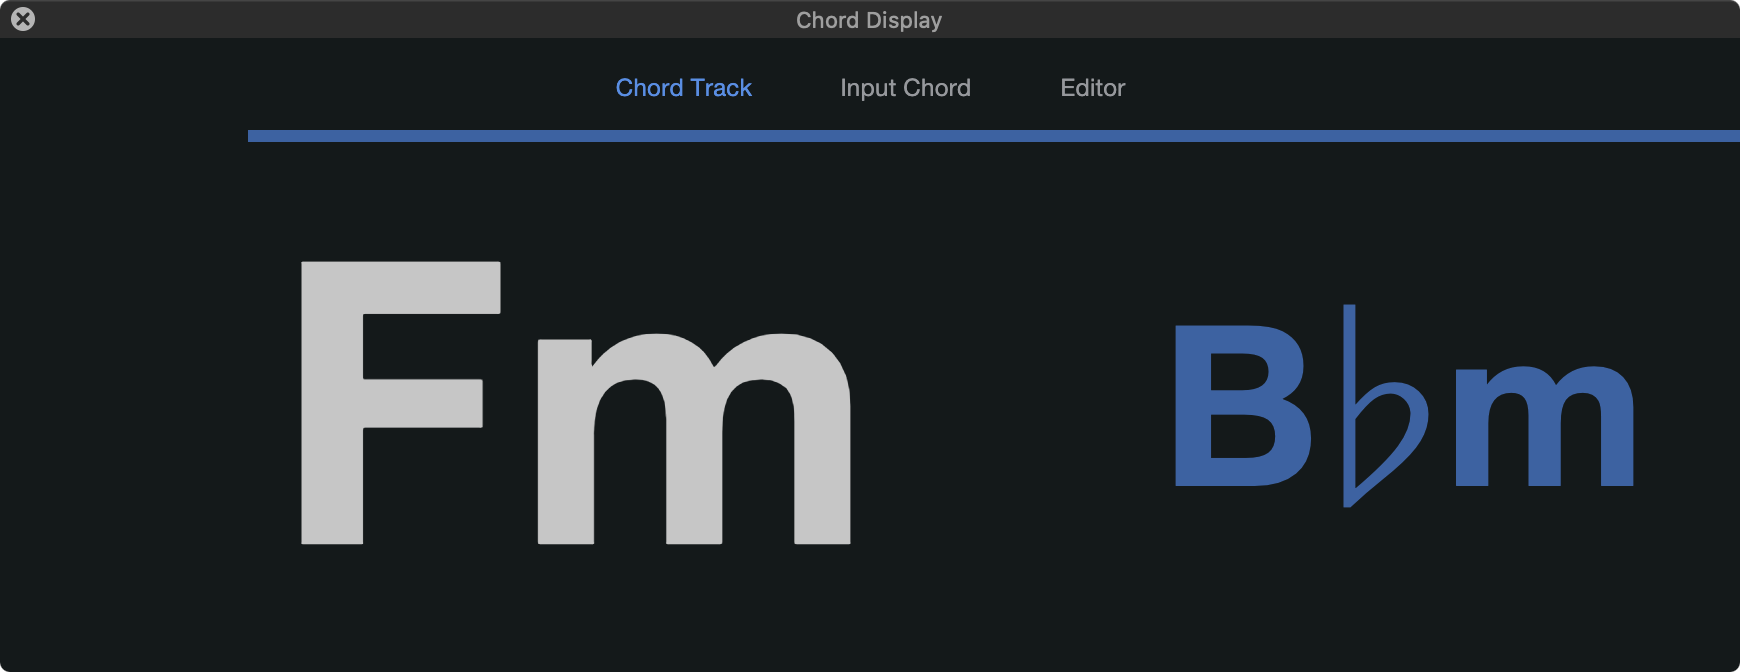
The floating, resizable Chord Display View presents several options for viewing Chords. Useful for easy sight-reading while practicing your instrument of choice... particularly when used in conjunction with loop points!
This window has three options:
-
Chord Track: Displays the chord from the Chord Track at the current playback position, as well as the next upcoming Chord (in blue).
-
Input Chord: Displays the chord currently being played on an external keyboard
-
Editor: Mirrors the current/selected Chord display in the Note Editor Inspector. When multiple tracks are visible in the editor, all of them contribute to the chord displayed. When no instrument editor is open, it displays the chord of a currently selected instrument track at the current playback point.
Chord Display can be accessed from the View drop-down menu, or via the contextual menu found by right-clicking on the Chord Track itself.
As stated in The Chord Inspector section, there are two Chord Display options to choose from within the Chord Display context menu in the inspector: Chord Display Mode and Chord Display Style.
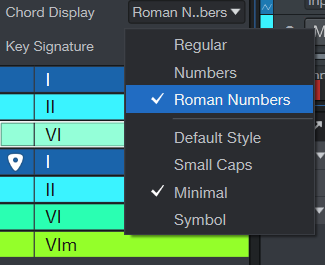
There are three different Chord Display Modes:
-
Regular: Displays the chords as letters rather than numbers. A major chord is represented by the root note alone (e.g., C). A minor chord is indicated by adding "m" or "min" after the root note (e.g., Cm or Cmi).
-
Number: For those who like to use the Nashville Numbering system, you can set your chords to be represented as numbers. A number by itself (without any other notation) is assumed to represent a major chord. Minor chords are noted with a dash after the number or a lowercase m (you can set whichever you’d prefer by changing the Chord Display Style).
-
Roman Numbers: You can also use Roman numerals to indicate chord function within a key (e.g., I for the tonic, IV for the subdominant, V for the dominant).
There are four different Chord Display Styles to choose from as well:
-
Default: There is no special Chord Display Style added when “Default” is chosen.
-
Small Caps: The Small Caps option uses letters and numbers rather than symbols ("mi" for minor, "aug" and "dim" instead of "+" and "°", etc.).
-
Minimal: This sets the style so that chord variations like minor or maj7 are displayed minimally (“m” for minor chords, “M7” for major 7 chords, etc.)
-
Symbol: This sets the style to symbols to match Nashville notation style (“-” for minor chords, “Δ7” for major 7 chords, etc.).